Part 3: Robot Museum Tour Guide
Project 4
Once you have trained a machine learning algorithm to recognize digits, you will use it on the robot to detect digits using the robot’s camera. The robot’s task will be to detect images in a museum (represented by a maze), and use the result to select which museum location to go to next. The waypoints corresponding to each digit will be provided by the instructors. The robot will use planning code from Project 3 to drive between the waypoints. Here is a visualization of the final demo:
The instructors will provide a list of digits and their corresponding waypoints. Not all digits will be represented. Here is an example waypoint course configuration, where the digit of interest is followed by a waypoint, in format [x, y, theta] (positions are in meters and angles are in radians):
0: [0, 0, 0]
3: [3, 2, -PI / 2]
5: [2, 0, PI / 2]
8: [0, 2, 0]
This configuration corresponds to the following map: 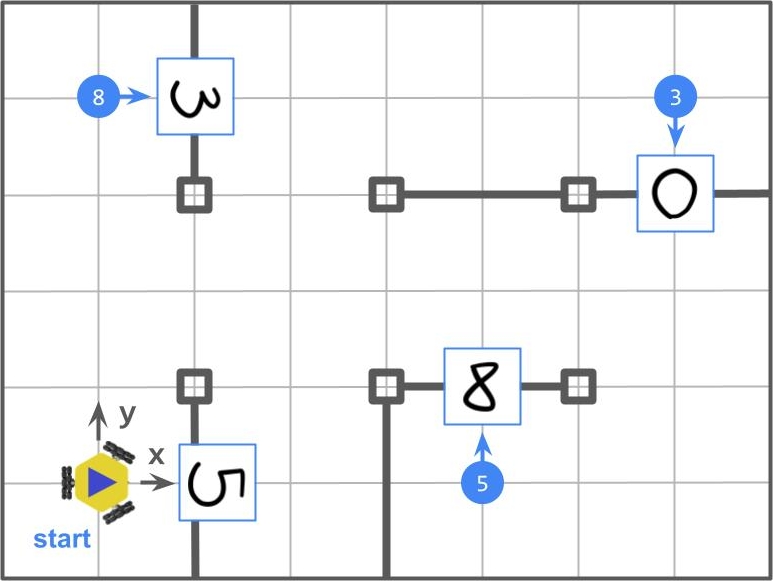
The waypoints are labelled in blue circles, and correspond to the waypoints given in the course configuration. On the wall facing the given configuration, there will be a handwritten digit (as shown in the image). The digit tells the robot which waypoint to visit next. All waypoints in the configuration will have a handwritten digit at the corresponding map location.
The robot will always start at [0, 0, 0]. A handwritten digit on the wall of the maze will tell the robot which waypoint to visit first. When the robot detects the digit “0”, it should return to the zero position, and stop execution (i.e. it should not travel back to the waypoint it detects at the origin). In the above example, the robot’s trajectory should be: “0” → “5” → “8” → “3” → “0”.
You will receive full points if the robot follows the path correctly as described by the configuration. You should print out the digit detected at each waypoint. You will not lose points for up to 1 incorrect detection. You must deal with the case where the robot detects a digit which does not correspond to a valid detection.
Robot Setup
You will use your code from Project 3 to generate plans between waypoints, and your model output from the Colab notebooks in Part 2 to detect digits. You can use the planning binary and classification model from either partner. Follow these steps to set up your robot:
-
Upgrade Python’s installer, Pip:
pip install --upgrade pip -
Clone your team’s repo onto the robot.
-
Install the dependencies for the project:
cd robot-tour-guide-f23-[TEAM]pip install -r requirements.txt -
Get the path planning executable from Project 3. This file gets placed in the build directory of the Project 3 repository and is called robot_plan_path. Place this file in the bin folder in your Project 4 repository.
-
Get the model from your Colab notebook. Place it in your repository. Update the variable PATH_TO_MODEL in the file robot_tour_guide.py to contain the path to the file.
Now you are ready to start coding!
Robot Code
Before running your code, you must create a map and be properly localized within it. Follow the localization instructions.
A number of helper functions have been created for you. You must follow the steps in Robot Setup above before writing or running any code.
Robot Functions: The Robot helper allows you to drive the robot, plan to and execute a path, and turn to a goal. Use this functionality as follows:
robot = MBot()  # This initializes communication with your robot.
plan_to_pose(x, y, robot)    # Use this to drive to a goal location.
turn_to_theta(theta, robot)  # Use this to turn to a goal angle.
Camera Functions: The camera helper looks for Post-It notes in the camera image, and returns a cropped and scaled image which is the correct size to pass through your classification algorithm. To use it, do:
ch = CameraHandler()  # This variable is defined for you in the template.
frame = ch.get_processed_image()   # Get the image of a digit from the camera.
If a digit is not detected in the frame, it will return None. You should handle this case. To save the image to the folder output, pass save=True to the above function. This will also save images at all stages of preprocessing. This might be useful for debugging.
To perform prediction on the frame using your model, do:
y_pred = model.predict([frame])[0]
Waypoints and Labels: A helper script has been provided to store and load waypoints paired with labels. See the intructions in README.md or run python3 waypoint_writer.py and follow the prompts. You will need to store waypoints and labels any time you move to a new course or update your map.