Project 3: Path Planning
Due November 22nd, 2022 at 11:59 PM.
For complete instructions about the project, see the Project 3 description on the main HelloRob website.
This project will have two components: an individual component where you plan paths throughout a map of Michigan, and a group component where you plan paths in a robot map.
Table of Contents
- Getting the Code
- Submitting the Assignment
- Part 1: Path Planning in Michigan
- Project Website
- Task Summary
- Advanced Extensions
Getting the Code
For Part 1 of this project, you can find the template code on Replit here.
For Part 2 of this project, one repository per team will be created for this project through GitHub Classroom, like in Projects 1 and 2. Both teammates will share ownership of the code and receive credit for writing the code through the license file.
The invite link to accept the assignment on Github Classroom can be found on Slack.
The first teammate to accept will need to create a new team. The team must be named P3 F22 Team ##. Replace ## with the team number assigned to you (for example, P3 F22 Team 01, P3 F22 Team 11, etc.). The next teammate should join the team from the list of existing teams.
Editing the code on Replit
For this project, we have created some tools so that you can develop and test your planning algorithms on Replit, without using the robot. When your code is working, you can then run it on the robot.
Replit supports cloning, running, and committed changes to GitHub repositories. Since the project repos are private, we have created an empty project on Replit within the Robotics 102 team which you can use to collaborate with your teammates on a private Replit. To run and edit your code on Replit, follow these steps:
-
Connect your Replit account to GitHub (all teammates). Click on your username on the top left corner of the Replit page and select “Account”. Scroll all the way to the bottom to “Connected Services” and select “Connect” beside the GitHub option.
-
Accept the assignment on GitHub Classroom (all teammates). This step is just like in Projects 1 and 2.
-
Fork the Replit Project (one teammate). On our class Replit team, select the project “Project 3: Path Planning” from the list. You will be prompted to join or create a new group. Select the option to create a new group. Make sure you tell your teammate(s) your Replit username.
-
Join the Replit Project (other teammate(s)). Join the group that your teammate has created by selecting their username.
-
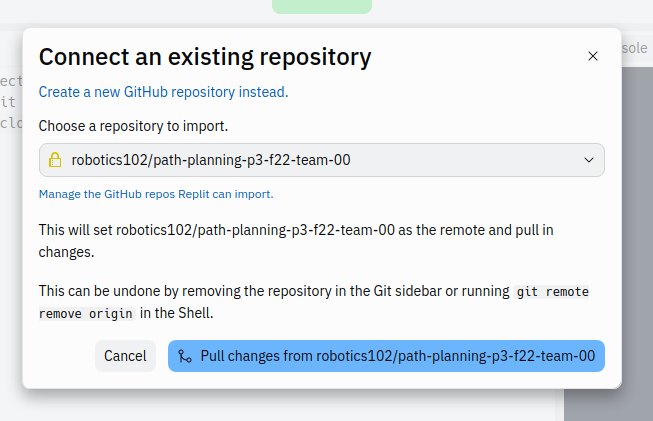
Connect your GitHub repo. Your new project on Replit should be empty. You will connect it to your existing project repo on GitHub. To do this, click on the Version Control panel and select the option to connect to an existing repo:
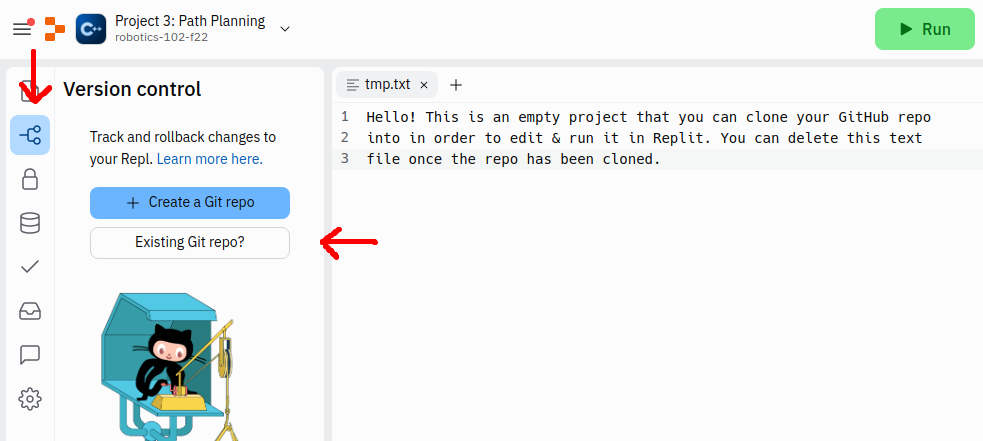
Paste the address of your repo in the popup that appears and click the button to pull the changes from the repo.
-
Delete the file
tmp.txtfrom the Replit project. This is there because Replit does not allow empty repositories.
All code developed on Replit should be pushed to GitHub. You can do this using the Version Control tab on the Repl. The instructors will not use Replit to view your code, so you should not submit it on Replit. If you are editing code on the robot, make sure your Replit project stays up to date by pulling new code. You can do this in the Version Control tab.
- Hint: Replit uses 2 spaces for indentation by default, but our code uses 4 spaces. You can modify the indent size in the Repl to 4 to make it easier to view the project code.
Completing the License
Modify the LICENSE.txt file to include the names of all teammates. Make sure the change is committed to your repository. This must be completed in order for your project to be graded, but this time, points are not awarded for completed the license.
- P3.0 (0 points): In the file
LICENSE.txt, replace<COPYRIGHT HOLDER>with the names of all teammates, separated by commas. Replace<YEAR>with the current year.
Submitting the Assignment
For Part 1 of the assignment, each student should complete the code on Replit individually. Use the “Submit” button to submit your assignment.
For Part 2 of the assignment, teammates will be graded together. You should push your code to your GitHub repository, and create a project webpage for your completed project. Include a link to your webpage in the README.md of your repository. For details about what should be on the website, see Project Website.
Grading Breakdown
This project will be graded as follows:
-
Path Planning in Michigan (5 points) Complete and submit your code to plan paths from one city to the next in Michigan. Your code should work for any start and goal city on the map. It should also work for different graph configurations (e.g., adding new cities). This portion of the project is completed and graded individually.
-
Breadth First Search in the Robot Map: (5 points) Your code should be pushed to GitHub and tagged. It should be organized and complete. The instructors will run your code to test your implementation.
-
Robot Path Planning Demo (in-class): (2 points) Your planning algorithm will be demonstrated on the robot, in class on Demo Day. The robot should navigate from a start location to a goal location given by the instructors.
-
Website: (3 points) On your website, include a brief discussion of your implementation (see reflection questions). For full credit, include multiple examples of maps and start and goal locations in the web app (you can take screenshots or screen recordings). Include at least one video of your algorithm working successfully on the robot.
Part 1: Path Planning in Michigan
The goal of this part of the project is to find a path using the Breadth First Search algorithm through Michigan. The Michigan map we will be using looks like this:
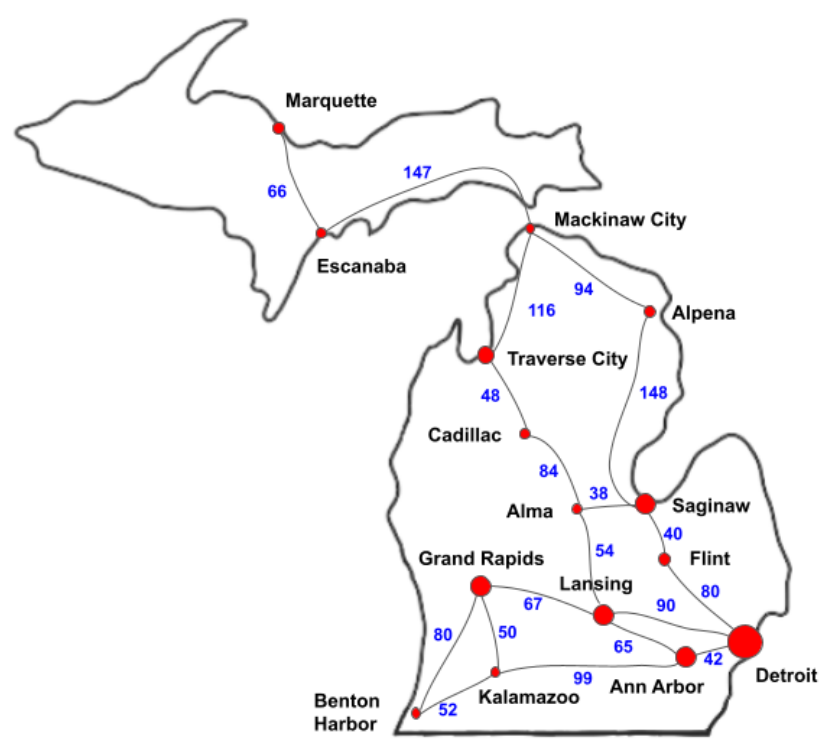
The graph data is stored in a text file called mi_graph.txt. It contains a list of cities, which are nodes in the graph, followed by a list of edges between the nodes. The edges are denoted by the names of the two connected cities, followed by the distance in miles between the cities.
- Hint: You can modify the map (for example, add some cities)! To do this, add the name of the city under where it says
NODES. Add the edges connected to the new city under where it saysEDGES, following this format (one line per edge):[my_new_city] [connected_city] [miles_between_cities]Don’t forget to update the numbers beside the headings
NODESandEDGESto reflect the total number of nodes and edges, respectively.
The map data is stored in a struct called Graph, defined for you, which looks like this:
struct Graph
{
  std::vector<std::string> data;
  std::vector<std::vector<int>> edges;
  std::vector<std::vector<float>> edge_costs;

  // TODO: Add any members you need to the graph.
};
The function createGraph("mi_graph.txt") populates a struct of type Graph with the Michigan map data defined in mi_graph.txt. The struct contains a vector of strings data, which stores a list of all the cities. We will use the index of the city in this vector to identify the node. You can get the number of nodes in the graph using data.size(). You can use the function nameToIdx("my_city", g.data) to get the index of a city from its name.
The vectors edges and edge_costs store the edges connecting the node and the distances of those edges, respectively. You should not need to access these directly. Use functions getNeighbors(idx, g) to get a list of the indices of the neighbors of the node at index idx, and getEdgeCosts(idx, g) to get a list of the distances to the neighboring cities.
Storing node data: First, decide how to store the various node data that you need to access in the BFS algorithm. Add members to the Graph struct to store this data. Make sure you store the index of the parent node during the search. The final path will be found by tracing backward through the parents, starting from the goal node, using the function tracePath(goal_idx, g) (where goal_idx is the index of the goal node).
- P3.1.1: Design a way to store node data needed in BFS. Add members to the
Graphstruct to store this data.
Initializing node data: You should start by initializing data for each node of the graph before the algorithm starts, so you can access and update it during your algorithm. This is done in the function initGraph().
- P3.1.2: Complete function
initGraph(). It should create space to store data for each node in the graph and initialize any data you might need.
Accessing node data: For the function tracePath() to work, it should be able to use the function getParent(idx, g) to get the index of the parent of the node at idx. Complete the getParent(idx, g) function to access the parent of a node.
- P3.1.3: Complete function
getParent(). It should return the index of the parent node. If the node has no parent, it should return -1.
Breadth First Search: Complete the function bfs() to find a path from the start to the goal node. Maintain a visit list containing node indices as a queue data structure. Use the function getNeighbors(idx, g) to get the neighbors of the node with index idx within graph g. When the goal is found, use the following code to get the path as a vector of node indices. This should work as written if you have maintained the parents of the nodes correctly and implemented getParent(), assuming goal_idx is the index of the goal node.
path = tracePath(goal_idx, g);
- P3.1.4: Complete function
bfs(start, goal, g). It should perform Breadth First Search to find a path from node indexstarttogoalwithin graphg.
Project Website
Create a website to demonstrate your implementation of path planning. Add the link to your project page to the README.md file in the root of your repository and push it to GitHub. For a refresher about how to create the website, see the Project 1 description.
On your project webpage, include multiple images and/or videos showing paths found by your breadth-first search algorithm (and by A-Star, if applicable). Include examples of different maps, with different start and goal locations on the web app. Include at least one video demonstration of your robot following a path and avoiding obstacles (for example, in a maze-like environment) using either BFS or A-Star. Remember to ensure that videos are visible to course staff.
Include a discussion section on the web page. Consider the following questions:
- What are the strengths and limitations of breadth-first search? Graph search in general?
- Does breadth-first search always find the shortest path? Does A-Star always find the shortest path?
- How might you improve the algorithm(s) you implemented? (Include at least one idea)
- (If you implemented A-Star) In what types of environments is A-Star much faster than BFS? Are there any environments where A-Star is not much faster than BFS?
Consider including images or videos whenever possible to illustrate your points. Keep the discussion brief: it should be no longer than one or two paragraphs. If you did not implement A-Star, you may ignore the A-Star questions or answer based on what we discussed in lecture.
Task Summary
Part 1: Path Planning in Michigan
- P3.1.1: Design a way to store node data needed in BFS. Add members to the
Graphstruct to store this data. - P3.1.2: Complete function
initGraph(). It should create space to store data for each node in the graph and initialize any data you might need. - P3.1.3: Complete function
getParent(). It should return the index of the parent node. If the node has no parent, it should return -1. - P3.1.4: Complete function
bfs(start, goal, g). It should perform Breadth First Search to find a path from node indexstarttogoalwithin graphg.
Part 2: Path Planning on the Robot
- P3.2.1: In the file
graph_utils.cpp, complete functionsfindNeighbors(). It should accept the index of a node and return a vector of indices of neighboring nodes. - P3.2.2: In the
graph_utils.hfile, design a data structure to store the cell information and modifyGridGraphto add any new member variables accordingly. - P3.2.3: In the
graph_utils.cppfile, complete functioninitGraph()to initialize the cell data. You can assume the graph will be loaded when the function is called. - P3.2.4: In the
graph_utils.cppfile, complete functiongetParent()so it returns the index of the parent of the given cell. If a cell does not have a parent, it should return -1. - P3.2.5: In the
graph_search.cppfile, implement Breadth First Search in functionbreadthFirstSearch(). - P3.2.6: In the
robot_plan_path.cppfile, call your path planning function and use thedrivePath()function provided to send the path to the robot.
Advanced Extensions
-
Advanced Extension P3.i (1 extension point): Implement A-Star path finding.
-
Advanced Extension P3.ii (1 extension point): Implement a Manhattan distance transform and use the result to check for collisions during path planning.
-
Advanced Extension P3.iii (1 extension point): Implement a Euclidean distance transform and use the result to check for collisions during path planning.